
MCP Integration Guide: Connect AI Agents to Tools
- Problem: A config can launch an MCP server while authorization, schema compatibility, tool safety, and failure handling remain untested.
- Solution: Select local stdio or remote Streamable HTTP from the trust boundary, then validate initialization, capability discovery, tool calls, and observability layer by layer.
- Result: You finish with an integration contract: pinned components, scoped credentials, known schemas, approval rules, test evidence, timeouts, logs, and a rollback path.
What Is MCP Integration and What Must Work?
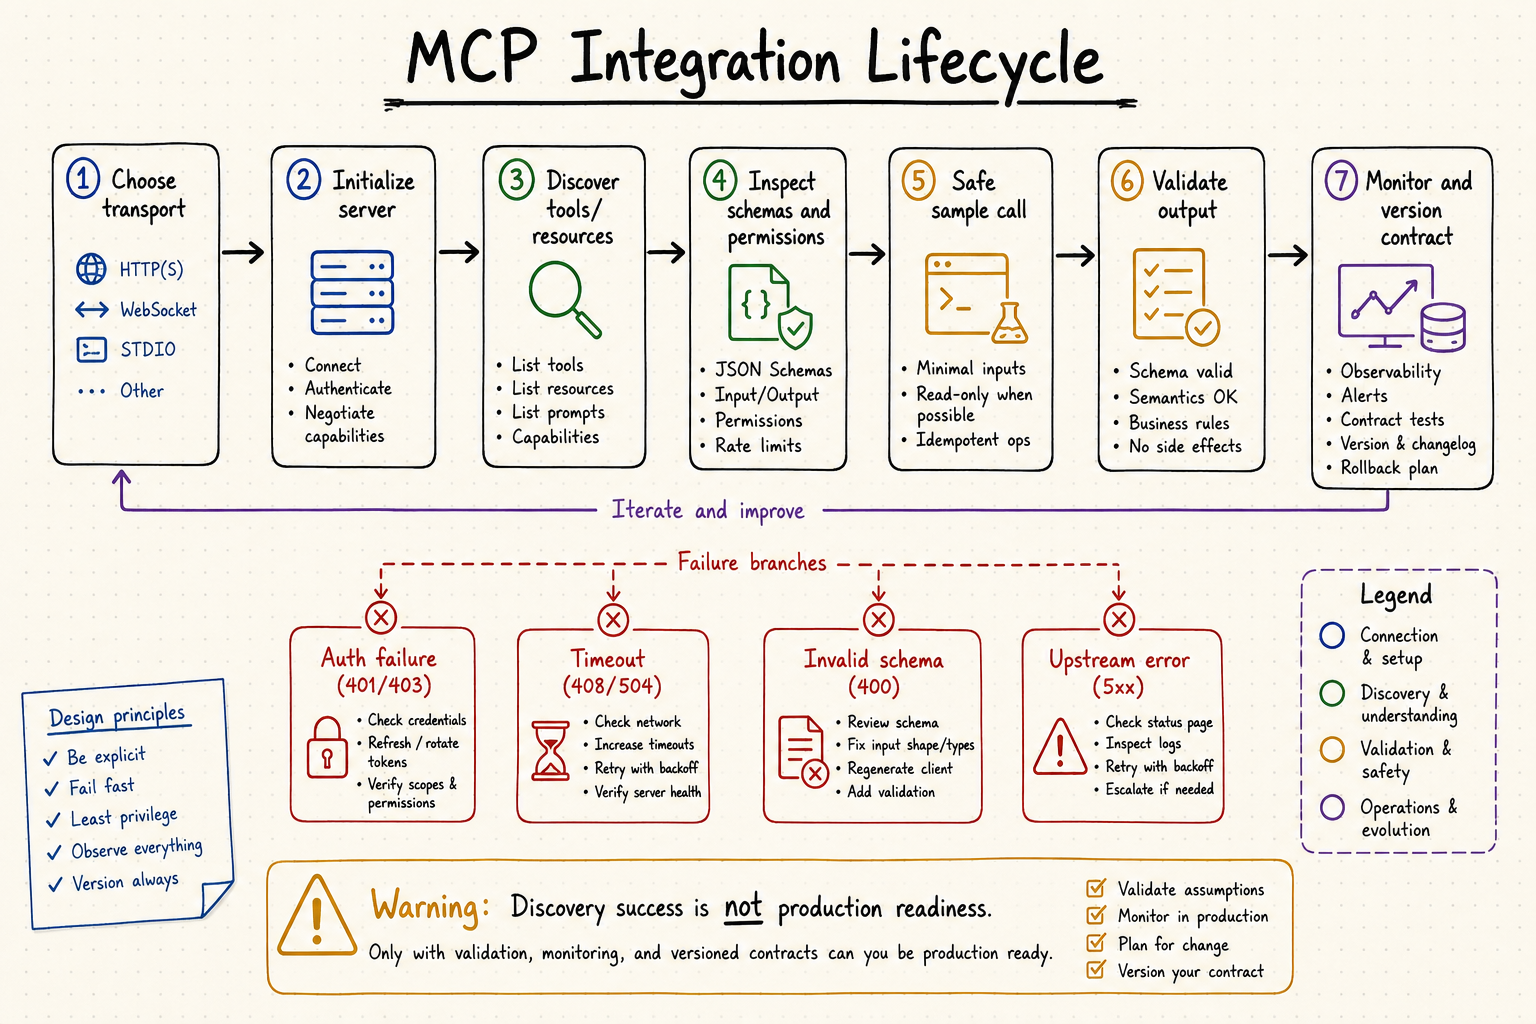
MCP integration connects an AI host to one or more MCP servers through a dedicated client connection. A complete integration must initialize the protocol, negotiate capabilities, discover typed tools or resources, authorize access, execute calls, validate results, and handle lifecycle failures—not merely start a server process.
MCP is an open protocol for connecting AI applications to external systems. Its official architecture separates the host, one dedicated client connection per server, the server, the JSON-RPC data layer, and the transport layer (Source: MCP architecture overview). The official SDKs implement protocol behavior across supported languages, while the debugging guide explains how to inspect lifecycle and transport failures.
MCP standardizes the connection and capability contract; it does not
decide which
Choose an MCP Integration Path Before You Configure
Choose the path from deployment boundary and trust requirements, not from the client name alone. Decide where the server runs, which transport it exposes, who owns credentials, what actions require approval, and how failures will be observed before editing configuration.
If you haven't selected a server yet,
Path 1: Connect a Local stdio MCP Server
Use this path when one user or workstation launches a trusted local server as a child process. The host starts the command, exchanges JSON-RPC messages over stdin and stdout, and terminates the process when the connection closes.
Step 1: Find your Claude Desktop config file
Claude Desktop stores local server launch definitions in its application configuration. Treat this file as executable configuration: review the command, package, arguments, working directory, environment variables, and filesystem scope before enabling a server.
-
macOS:
~/Library/Application Support/Claude/claude_desktop_config.json -
Windows:
%APPDATA%/Claude/claude_desktop_config.json -
Linux:
~/.config/Claude/claude_desktop_config.json
Create the file only when the host documentation requires it, keep valid JSON, and restrict access because environment values may contain secrets. Prefer secret references or the operating system credential store over committed plaintext values.
Step 2: Add your MCP server configuration
Add one server at a time. Pin a reviewed package version where practical, pass only the directories or resources the server needs, and run the launch command manually before asking the host to start it.
{
  "mcpServers": {
    "filesystem": {
      "command": "npx",
      "args": ["-y", "@modelcontextprotocol/server-filesystem", "/path/to/dir"]
    }
  }
}
Step 3: Restart Claude Desktop
Restart the host after saving the configuration, then inspect its MCP settings or logs. A listed server proves that the process started; it does not prove every tool is safe or that every call succeeds.
Confirm the host can complete initialization, negotiate capabilities, and list tools. Record the advertised tool names and input schemas so later upgrades can be checked for contract drift.
Adding more servers
Multiple servers increase capability coverage and also increase prompt surface, secret exposure, startup time, and the chance of ambiguous tool selection. Add only the servers needed for the current workspace and disable unused write-capable tools.
{
  "mcpServers": {
    "pulse": {
      "command": "npx",
      "args": ["-y", "@pulsemcp/core"]
    }
  }
}
Verifying your connection
Verify the protocol before testing a natural-language task: confirm initialization succeeds, list tools, inspect each input schema, then call one read-only tool with known arguments and compare the result with the source system.
- "List the files in my configured directory"
- "Show me the recent commits in my GitHub repository"
- "What's the status of my connected services?"
A useful smoke test proves five things separately: the process starts, capability negotiation succeeds, the expected tool is exposed, invalid arguments are rejected, and a valid call returns typed content without leaking secrets.
If the connection fails
Diagnose failures by layer: process launch, transport framing, initialization, schema discovery, authorization, downstream API, and result validation. Preserve request IDs and sanitized stderr logs so a generic host error can be traced to the failing layer.
- Config file not found: Verify the path matches your OS (see Step 1 above)
- JSON syntax error: Run your config through a JSON validator — trailing commas and missing quotes are common mistakes
-
Server package not installed: Run
npx -y @modelcontextprotocol/server-filesystemmanually to verify the package works - Permission denied: On macOS, ensure Claude Desktop has file system access in System Settings
Switching between servers
Enable servers per task and keep write-capable tools behind explicit confirmation. Tool descriptions are instructions presented to the model, not a security boundary; enforce scopes, path allowlists, and authorization in code.
IDE hosts often support project and user scopes. Keep portable, non-secret configuration in the project and place credentials in environment variables or approved secret stores; never commit tokens to the repository.
Step 1: Create the Cursor MCP config directory
In your project root, create a .cursor folder if it
doesn't exist. Inside that folder, create mcp.json:
mkdir -p .cursor
touch .cursor/mcp.json
Step 2: Add your MCP server configurations
Edit .cursor/mcp.json to include the servers you want.
Here's a configuration that connects both filesystem and GitHub:
{
  "mcpServers": {
    "filesystem": {
      "command": "npx",
      "args": ["-y", "@modelcontextprotocol/server-filesystem", "./project-files"]
    },
    "github": {
      "command": "npx",
      "args": ["-y", "@modelcontextprotocol/server-github"],
      "env": {
        "GITHUB_PERSONAL_ACCESS_TOKEN": "your-token-here"
      }
    }
  }
}
Step 3: Restart Cursor
Reload Cursor after changing configuration and inspect the MCP settings panel. Confirm the intended scope is active, the command resolves in Cursor's environment, and no duplicate server name shadows another definition.
Verifying your connection
Start with a read-only, deterministic call. Ask for a known file or repository fact, inspect the proposed tool and arguments before approval, and compare the returned value with the source.
If discovery works but execution fails, separate schema errors from permission errors and downstream failures. Check the host log, server stderr, required environment variables, executable path, and package version.
Other AI IDEs with MCP support
Other MCP-capable IDEs differ in configuration scope, remote-server support, approval UX, and secret handling. Use each host's current documentation instead of assuming every client accepts the same file path or fields.
-
Windsurf: Uses
~/.windsurf/mcp.jsonfor global config or.windsurf/mcp.jsonfor project-local - VS Code with Copilot: MCP support is experimental; check the VS Code extensions documentation for setup
- JetBrains AI Assistant: Configuration varies by IDE version; see JetBrains documentation
The core config format (mcpServers JSON object) is
consistent across these tools, so the servers you configure will
work similarly.
Path 2: Connect MCP in Cursor and Other IDEs
Use an IDE-scoped integration when tools should follow a repository or development workspace. This improves portability, but shared configuration must remain least-privilege and must not contain user credentials.
Why use Cursor over Claude Desktop for MCP?
Cursor is useful when MCP calls are part of code navigation, issue investigation, tests, and repository workflows. The important design choice is not the editor brand; it is whether the project may declare tools and how each developer supplies credentials safely.
Define approval rules for destructive actions, keep repository and account scopes narrow, and document which tool results may enter model context. For regulated code or data, confirm retention and remote-processing boundaries before enabling a server.
Step 1: Create the Cursor MCP config directory
In your project root, create a .cursor folder if it
doesn't exist. Inside that folder, create mcp.json:
# Create the config directory and file
mkdir -p .cursor
touch .cursor/mcp.json
Step 2: Add your MCP server configurations
Edit .cursor/mcp.json to include the servers you want.
Here's a configuration that connects both filesystem and GitHub with
proper authentication:
{
  "mcpServers": {
    "filesystem": {
      "command": "npx",
      "args": ["-y", "@modelcontextprotocol/server-filesystem", "./project-files"]
    },
    "github": {
      "command": "npx",
      "args": ["-y", "@modelcontextprotocol/server-github"],
      "env": {
        "GITHUB_PERSONAL_ACCESS_TOKEN": "your-token-here"
      }
    }
  }
}
Step 3: Restart Cursor
After reloading the IDE, verify the server identity, advertised capabilities, and exact tool schemas. Do not approve a call solely because its natural-language description sounds correct.
Run a known-answer test, an invalid-input test, a permission-denied test, and a timeout test. These four cases reveal more about production readiness than a single successful demo.
Adding environment-specific configurations
Separate development and production identities rather than swapping files that contain secrets. Use environment-specific secret stores, distinct scopes, and explicit server versions; keep shared project configuration free of credentials.
-
.cursor/mcp.json— development config (includes debugging tools) -
.cursor/mcp.prod.json— production config (includes monitoring tools)
Make environment selection explicit in the launch command or deployment system, and fail closed when a required secret or endpoint is missing.
Common Cursor MCP use cases
Teams commonly use IDE MCP integrations for repository search, issue context, documentation lookup, test execution, database inspection, and deployment diagnostics. Keep mutation tools separate from read-only discovery whenever possible.
- Code review automation: Connect GitHub server to automatically fetch PR details and suggest reviews
- Documentation generation: Connect to internal wikis or Confluence for context-aware doc generation
- Database queries: Connect to MCP servers that wrap your internal data tools
- API testing: Connect to HTTP request tools for testing APIs directly in the IDE
Other AI IDEs with MCP support
Support details change quickly across IDEs. Verify the current host documentation for configuration location, transport support, authorization, enterprise policy controls, and user approval behavior.
-
Windsurf: Uses
~/.windsurf/mcp.jsonfor global config or.windsurf/mcp.jsonfor project-local - VS Code with Copilot: MCP support is experimental; check the VS Code extensions documentation for setup
- JetBrains AI Assistant: Configuration varies by IDE version; see JetBrains documentation
The core config format (mcpServers JSON object) is
consistent across these tools, so the servers you configure will
work similarly.
Path 3: Build an MCP Server with the Official SDK
Build a server when no maintained implementation exposes the exact operations and trust boundary you need. The official SDKs cover clients and servers in TypeScript, Python, C#, Go, and other languages; choose by runtime ownership and deployment constraints.
Step 1: Install the FastMCP SDK
Use an official, actively maintained SDK and pin a tested version. Define the server name and version, then implement the smallest tool surface needed for the workflow.
# Python
pip install fastmcp

# TypeScript / Node.js
npm install @modelcontextprotocol/sdk
Step 2: Define your tool handlers
Use typed input schemas, clear descriptions, bounded outputs, explicit error results, and timeouts around downstream calls. Tool annotations help clients present risk but do not replace authorization or server-side validation.
from fastmcp import FastMCP

mcp = FastMCP("my-data-tool")

@mcp.tool()
def analyze_data(query: str, timeframe: str = "7d") -> str:
    """Analyze data from your internal database.

    Args:
        query: The analysis question
        timeframe: Time window (1d, 7d, 30d)
    """
        # Your custom logic here
    results = f"Analysis for {query} over {timeframe}: [data]"
    return results

@mcp.resource("database://schema")
def get_schema():
    return "Table: users | Columns: id, name, email, created_at"

mcp.run()
Step 3: Start your server and connect
For stdio, let the host launch the server and reserve stdout for protocol messages; write diagnostics to stderr. For remote deployment, expose Streamable HTTP, implement the documented authorization flow, and test concurrent clients and reconnection.
# Run your server
python my_server.py

# Add to Claude Desktop config (~/.config/Claude/claude_desktop_config.json)
{
  "mcpServers": {
    "my-data-tool": {
      "command": "python",
      "args": ["/path/to/my_server.py"]
    }
  }
}
When to choose Path 3
Choose a custom server when you need internal business logic, a controlled data boundary, stable schemas, or auditability that a third-party server cannot provide. Budget for dependency updates, protocol compatibility, observability, and incident response.
If a maintained server already fits the required operations and trust boundary, integrate and test it instead of rebuilding. Managed discovery can reduce search effort, but it does not remove the need to inspect schemas and permissions.
For a full comparison of MCP server options including prebuilt servers, see our server guide.
Path 4: Add QVeris as a Managed Capability Layer
Use QVeris as a complementary capability discovery and routing layer when an agent needs to find and inspect many external data or tool capabilities. Keep the distinction clear: MCP defines the connection protocol; QVeris helps discover, inspect, and call capabilities through its supported interfaces.
How Qveris differs from manual MCP server setup
Direct MCP integrations usually give each server its own process or endpoint, credentials, scopes, lifecycle, logs, and upgrade policy. That isolation improves control but increases operational work as the server count grows.
- Filesystem server for file operations
- GitHub server for repository access
- Slack server for team communication
- Database server for data queries
- ...and so on for each tool you need
A managed capability layer centralizes discovery and invocation patterns. Evaluate it as an additional dependency: verify supported operations, provider provenance, data handling, authentication, quotas, latency, failure behavior, and exit strategy before production use.
Step 1: Install Qveris CLI
Install the documented QVeris CLI package, confirm the package publisher and version, and keep production versions pinned through your normal dependency-management process.
npm install -g @qverisai/cli

# Or use npx without installing
npx -y @qverisai/cli --version
Step 2: Get your API key
Create a QVeris account and obtain credentials from the official dashboard at qveris.ai. Keep keys out of source control, use the narrowest available scope, and rotate any credential exposed in a log, screenshot, or committed file.
Step 3: Add Qveris to your MCP config
Add the documented QVeris MCP server package to the host configuration, then verify the package name and launch command against the current QVeris documentation before deployment.
// Qveris: One config, many capabilities
{
  "mcpServers": {
    "qveris": {
      "command": "npx",
      "args": ["-y", "@qverisai/mcp-server"],
      "env": {
        "QVERIS_API_KEY": "your-api-key"
      }
    }
  }
}
After connection, use discovery to identify candidate capabilities, inspect the selected schema and provider notes, then call with validated arguments. Do not treat a successful connection as evidence that every downstream capability is appropriate for the task.
Understanding capability routing
Capability routing starts from the task rather than a remembered provider name. A production policy should still filter candidates by data source, freshness, region, cost, latency, authentication, and allowed operations before selection.
- "I need to check the weather in Tokyo" → routes to weather capability
- "Get me the current Bitcoin price" → routes to cryptocurrency capability
- "Search for recent news about AI" → routes to search capability
Centralized discovery reduces catalog work, but responsibility remains with the application. Validate inputs and outputs, attach provenance, set budgets and timeouts, redact secrets, and define deterministic fallbacks for critical tasks.
When to choose Qveris capability routing over manual MCP setup
Consider a managed layer when many read-oriented capabilities share the same governance model and your team values centralized discovery. Prefer direct servers when isolation, on-premises execution, custom authorization, or deterministic provider selection is mandatory.
- You need 10+ capabilities: Installing and maintaining 10 individual MCP servers takes hours; Qveris capability routing handles this in one config line.
- Your tools lack official MCP servers: Many internal tools, legacy systems, and niche services don't have published MCP servers. Qveris's capability routing can connect to these through its managed integrations.
- You want centralized auth: Instead of managing separate API keys for each MCP server, Qveris capability routing uses a single authentication flow.
- You're prototyping rapidly: Qveris capability routing lets you explore available capabilities before committing to specific server configurations.
Direct and managed paths can coexist. Keep sensitive or destructive integrations isolated, and use the managed layer for approved discovery-oriented capabilities. Document which path owns authentication, validation, logging, and incident response.
Step 4: Use Qveris capabilities
Use the documented discovery and inspection commands to identify a capability before calling it. Save the selected capability identifier, input schema, provider, expected units, and validation rules with the workflow definition.
# List available capabilities
qveris discover "file operations" --json

# Query financial data
qveris discover "cryptocurrency market data" --json

# Access map and location services
qveris discover "geographic data" --json
Comparing the four paths
Compare the four paths by deployment boundary, transport, credential ownership, operational responsibility, and control—not by optimistic setup-time promises.
| Path | Time | Complexity | Capabilities | Maintenance |
|---|---|---|---|---|
| Path 1: Claude Desktop | Host-dependent | Low | Per-server | Per-server updates |
| Path 2: Cursor / IDEs | Host-dependent | Low | Per-server | Per-server updates |
| Path 3: Custom SDK | Build-dependent | Medium | Custom-built | Ongoing maintenance |
| Path 4: Qveris | Under 1 min | Managed | many unified | Single provider |
For a full comparison of MCP server options including prebuilt servers and managed approaches, see our server guide.
Access many Capabilities Without Managing Individual MCP Servers
Use QVeris to discover candidate capabilities, inspect schemas and provider notes, then call only the capability your application has approved.
Try Qveris CLI →FAQ
About this guide
Author: Linfang Wang, CEO & Founder, QVeris AI.
Last updated: August 4, 2026. Reviewed against the official MCP architecture, SDK, transport, authorization, server, client, and debugging documentation.
How we evaluated: We separated each path into host, client, server, transport, credentials, schema discovery, tool execution, result validation, and operations. Claims that could not be verified from current official documentation were removed.
Conflict of interest: QVeris publishes this guide and provides capability discovery and routing. The guide distinguishes QVeris from the MCP protocol and includes direct-server paths that may be a better fit for isolation or compliance.
Update cadence: Review after material MCP specification, SDK, host-configuration, or QVeris package changes. Verify current client instructions and package versions before deployment.